It was about half a year ago I realized something ridiculous: USB networking devices commonly ship with a full sized CD in order to include the drivers. Clumsy, prone to scratches and difficult to carry, the driver CD successfully defeats the portability of a wireless USB dongle which, to me, is the only real reason to buy one; wireless for most any machine anywhere.
This got me wondering why manufacturers don’t simply include a small amount of flash storage on the wireless dongle to stash the drivers on. This brought on a series of thoughts:
- They’d need to integrate a USB Hub into the device. This will make it larger, but likely wouldn’t be much different than early 802.11g USB adapters, so it should be possible to do without blocking another USB port.
- If it’s just a hub, flash storage and wireless, I could probably strip down a HUB and solder in the remaining components.
- If I’m making this myself, why limit myself to just the drivers on the flash storage? Bootable Linux, an encrypted partition and a suite of portable apps would be handy.
- Well, it’ll probably end up being a 4 port hub, so I might as well throw something else that might be useful on there … Bluetooth, maybe.
- That’ll leave me with 1 spare port as a sort of pass-through port for any other USB devices.
The result of this chain of thinking developed in my head into a sort of Swiss Army Knife of thumb drives, so I threw the needed parts onto my Amazon Wishlist and waited for Christmas to roll around ... then promptly ordered the needed parts on Deal Extreme ... and then, despite the removal from my wishlist, received the parts (minus bluetooth) as a Christmas present, anyway.
Between the brand of motherboard, the brand of BIOS on the board, and chips used in the USB hub, there's a lot of variables that made me question the viability of booting through the hub. So before I busted out the soldering iron, I decided to partition the drive, install Ubuntu and attempt a boot through the hub before stripping the USB plugs off.
 I first booted Ubuntu from CD, launched GParted (System->Administration->GParted) and selected my thumb drive from the list in the upper right corner of the menu.
For each partition depicted, I right clicked it, selected 'unmount' and then again right clicked and selected "delete". In my case, I only had the one partition to unmount and delete. Always take care to back up any data before partitioning and if your drive already has exsisting partitions, do not delete any partitions that have data you may want to keep.
 GParted should now be showing your drive as having 'unallocated' space. I right clicked this space, selected 'new' and created the first of two FAT32 partitions. It's important to note that Windows XP SP3, Windows 7 and apparently Windows Vista (possibly others as well) don't typically like partitioned flash drives. The error message varies between XP and newer flavors of Windows, but the effect is the same. The end result is that it's important to make the first partition you create, the one you will want to be able to access in Windows. Also, when creating this partition be certain to leave at least 1GB (1024MB) available for the Linux install. In my case, I knew that I will be wanting to install other applications on top of the default Unbuntu install, so I set my first partition to be 1024MB and used the remainder of my 4GB thumb drive for the Linux install. To commit the configuration to the thumb drive, I clicked the green check mark in the toolbar and exited GParted when all actions were complete.
 Next, I started the USB Startup Disk Creator (System->Administration->USB Startup Disk Creator), confirmed that the, "Source disk image" is the CD I booted from, that the "Disk to use" was set to the correct partition on my thumb drive and then adjusted the "How much" slider (note that I failed to do this before capturing the screenshot). The Slider value determines the amount of space that will be available for documents and settings. In the past, I've set this to the maximum value and gotten undesirable results, so I set my to 1.8GB out of the available 2.1GB before clicking the "Make Starup Disk" button.
 Next, I clicked Applications->Games->Gnometris. When the "Copying Files..." progress bar reached 100% I completed my Gnometris sesssion and quit the application.
To test the installation, I plugged the thumb drive directly (without the hub) into one of the USB ports on my HP dv7 (bios version x.y.z) to make sure the install took. I got to the Ubuntu language splash and called it good. Next, I plugged in through the hub with the wireless dongle also attached and tested again doing a full boot into the OS. It was a little tricky because where the boot pauses when coming up from a CD drive is entirely different than when it pauses when booting off of a flash drive. It faked me out more than once, but I managed to resist dropping the power button and successfully booted. I changed some settings to the system and told Ubuntu to restart. This is where things got a little tricky. What I learned from trial and error is that a soft restart (telling Ubuntu to restart the computer or using ctrl+alt+del in the computer's boot options menu) causes the flash drive to not appear in the boot list. However, when I cycled the power with the power button (hard reboot), the device appears.
I also tested it on my custom built desktop (Gigabyte BIOS version x.y.z) through a front USB pannel port on my card reader which is effectively another USB hub. Despite booting through two generic hubs, I encountered no problems.
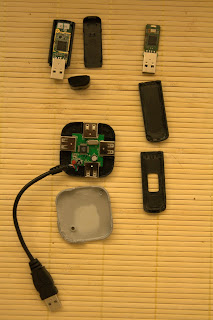
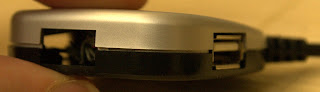
Overall, booting through the hub was a little quirky, but successful. Next step is to take everything apart. This was surprisingly easy across the board. It was mostly just a matter of finding a good point to separate the two halves of the plastic shells.
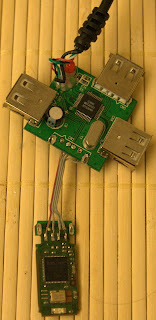
Removing the USB ports on the hub proved tricky. Initially, I tried heating the solder points with gentle pressure, but was unable to keep all four points of solder hot at the same time. My next choice would have been to use solder wick, but didn't have any on hand, so I dug out the solder sucker only to find the commercial solder cools far to fast to 'suck' any of it off. While solder wick probably would have done the trick to remove the USB port intact, I don't really care to use it and just as importantly, I didn't feel motivated to try and acquire any. I found the seam on the bottom of the USB port and bent either side up and around to the top of the port. This freed the outer portion of the USB port from the pins inside, leaving only two solder points and then the individual pins to undo.
Removing the USB plug from the wireless dongle was problematic to say the least. The solder point on which the USB port was mounted shared a common solder point with a component. Also, it seemed that the melting point of the board was lower than that of the solder. I decided to forgo the bend and de-solder method I had adopted and instead clipped the mounting pins using the tip of my wire cutters. I had not expected this to work let alone be so easy. The interior plastic pulled off of the pins easily as usual, but I had to take extra care removing the pins so as not to bend the slowly melting circuit board and also to not burn myself as this circuit board did not protect me from heat like the others did.
Careful as I was, it still wasn't good enough. While soldering the wires onto the wireless dongle, the foil for one of the USB port contact points lifted off the board. Frankly, I would rather have burned myself. Despite my terrible soldering iron, I managed to solder the wire directly to the first component on the board that was connected to that point and, most importantly, the device still works.
 Removing the plug on the flash drive was a no-fuss affair. I was able to de-solder each pin connecting the USB plug to the circuit board and then de-solder the mount points.
I'm still awaiting the Bluetooth adapter I ordered from Deals Extreme, but based on pictures I've seen the biggest challenge will gripping such a small device without damaging it.
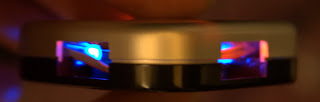
From here, I did a test boot, connected to the wireless (note that for this ralink based device I had to blacklist the abcxyz kernel module). I used a strip of scotch tape end-over-end on my newly soldered components so I don't short anything out and I (veeery carefully) cram everything back into the case of the USB hub.